Quick Masks
 What is a mask? In image editing terms, a mask is a selection
tool. Think of it as a template, or a precise cut-out which outlines the areas of the
image you want to edit, or to protect from changes. The PhotoShop quick mask is
one of my favourite selection tools, because it offers extremely precise
control over the selection process. The other quick and dirty selection tool I use quite
frequently is the magic wand. The magic wand is a fairly arbitrary selection
tool, however. Selecting areas you want is a process of trial and error; a real hit and
miss affair. You can never be sure exactly what areas the magic wand will select.
Sometimes you have to try many times before you are satisfied with the results. The magic
wand selection tool works best when used to quickly select large areas of similar colour
information, like the background of an image, for example.
What is a mask? In image editing terms, a mask is a selection
tool. Think of it as a template, or a precise cut-out which outlines the areas of the
image you want to edit, or to protect from changes. The PhotoShop quick mask is
one of my favourite selection tools, because it offers extremely precise
control over the selection process. The other quick and dirty selection tool I use quite
frequently is the magic wand. The magic wand is a fairly arbitrary selection
tool, however. Selecting areas you want is a process of trial and error; a real hit and
miss affair. You can never be sure exactly what areas the magic wand will select.
Sometimes you have to try many times before you are satisfied with the results. The magic
wand selection tool works best when used to quickly select large areas of similar colour
information, like the background of an image, for example.
I use the quick mask selection tool for basically 2 purposes
- to select and cut out a precise portion of the image, and to work on the background of
an image.
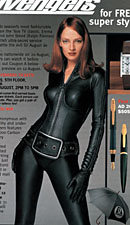
Take a look at the 2 pictures below of the lovely Uma
Thurman. By the way, Uma Thurman looks absolutely fabulous in the movie, The
Avengers. Shame that the rest of the movie sucked. The image on the left was
a raw scan from an advertisment in a magazine.
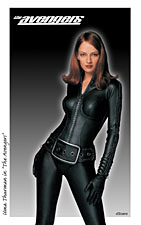
The background was a real mess, and it really detracts from
Ms Thurman. The second image is the finished product. The shape of Ms Thurman was
carefully cut out from the messy background using the quick mask option and copied over to
another more suitable background. The Avengers logo was selected
using the magic wand tool and then resized and copied over to the second image. Now Uma
looks much better in the second picture, don't you think?
Using the quick mask tool is simplicity itself. Click the
quick mask button, and paint in your selection. Use black to paint in the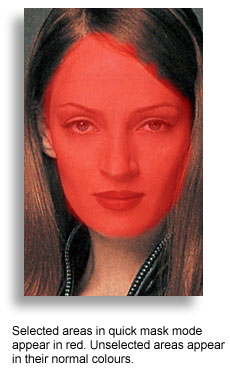 areas you would
like to select. When you start painting in the quick mask mode, the selected areas appear
as red. If you make a mistake, don't sweat it. Just use white to paint away your mistake.
Black adds to your selection, white subtracts from it. You can also switch between the
various brush sizes - choose a fine tipped brush for detailed work, or select a broad
brush size for coarse selection. Take a look at Uma's picture below. No, that's not her
having bad case of sun-burn. I've selected her face by using the black brush to paint in
the parts that I want. If I'm so inclined, I have simply "lift" Uma's face off
her body and transplant her on another body - not that I would do such a dastardly thing,
of course. But you do see this kind of photo compositing in the supermarket tabloids.
areas you would
like to select. When you start painting in the quick mask mode, the selected areas appear
as red. If you make a mistake, don't sweat it. Just use white to paint away your mistake.
Black adds to your selection, white subtracts from it. You can also switch between the
various brush sizes - choose a fine tipped brush for detailed work, or select a broad
brush size for coarse selection. Take a look at Uma's picture below. No, that's not her
having bad case of sun-burn. I've selected her face by using the black brush to paint in
the parts that I want. If I'm so inclined, I have simply "lift" Uma's face off
her body and transplant her on another body - not that I would do such a dastardly thing,
of course. But you do see this kind of photo compositing in the supermarket tabloids.
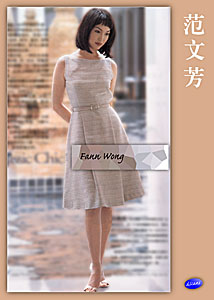
Sometimes I use the quick mask tool to select and work on the
background. As an example, take a look at the image below. The original background was a
jumbled mass of text and other assorted graphics. Cleaning them up would have been a
nightmare. I simply painted in the model's shape as a selection and inverted it
[Select > Inverse] so that the background is selected. A little judicious application
of the gaussian blur filter is all that's needed to make the background fade away
and make the foreground image stand out.
Equipment |
Memory | Resolution |
Calibration | Moire
| Quick Masks | File Formats